a zero carbon Victorian semi?

Chorlton001We moved out of Hulme after 20 years as we had outgrown our flat, price restricted us to a pretty run down house backing on to the pizza shop. It had been separately let rooms before we returned it to a family house. The order of the works below is the order we had to do it in to minimise the health hazards.

We have occasional days when you can have a look at the work we’ve done and talk to us about how to do it to your own home – the next one is on March 16th, books here: Superhome website

Living without a car

We are experimenting with having no car – while we were doing alot of building work a Landrover was great for collecting materials and also not bad at ferrying four children and assorted friends around the place too.  Thanks to an idiot on the A14 who left us spinning upside down in the wreckage of the Landrover, living without a car became quite a popular idea as several of us would rather never get in one again.  Trains for long journeys are proving less stressful, and not too expensive if booked well in advance.  Some of us are happy to cycle for miles, others like the Metrolink more.  But to get kids to places that public transport doesn’t reach, of which there are many even in the city, we’ve joined City Car Club  – we can book online and take a car from 5 minutes up the road and it’s almost like owning your own car except without paying the insurance, MOT, fuel or repairs. Bookings are by the quarter hour and can be extended from inside the car if you are running late (unless someone else has booked straight after you).  So far there has always been a car available, even at short notice, and the Car Club staff are very helpful if you have idiotically booked for the wrong date or have other technical issues.

Paints

Everywhere that needed it has been replastered – some areas with standard plaster, such as the plasterboard ceilings we had put up before we thought about lime plaster.  Where we were patching up the old lime plaster or could plaster onto brick we have used lime plaster, because it will buffer the moisture in the house – if the air gets damp the plaster will take up some of the moisture and let it back out when the air is drier.  Lime plaster also allows the moisture through the structure, so that moisture doesn’t get trapped inside which is bad for air quality and aggravates things like mould growth and dust mites.

So when we came to choosing paints, we wanted to keep the moisture permeability.  This meant choosing clay paints – most of which come solely in disgusting shades of brown and green.  We were saved by Earthborn, who do 126 colours of clay paint which goes on very nicely – the finish looks slightly chalky (although it doesn’t come off) and the colours change with the light in an interesting way.  One area of standard plaster got ECOS paint to get a particular colour, but the ECOS paint was not happy on the lime plaster – it looks quite patchy even after 3 coats.  The Dulux paint now marketed as “eco paint” has low VOC (fumes) but is an acrylic paint so not vapour permeable and there are environmental issues with the manufacture.  We bought the Earthborn paints from Ty Mawr.


Cold cupboard & magnesium boards

We’ve been experimenting with making a “cold cupboard” in the kitchen, like an old fashioned larder.  We did this by building the cupboard against the wall before it was internally insulated and then insulating the frame and doors of the cupboard (using Spacetherm).  During the winter the cupboard has been at 4-10 C depending on the outside temperature and it’s been a good place for jars of jam etc that were previously taking up fridge space as well as vegetables and it’s ideal for beer! The internal shelves have been made from magnesium boards from Econicboard who were really helpful and stock the board in lots of thicknesses.  The advantages are that it is moisture and mould resistant, non hazardous and strong.  It has low thermal conductivity so should help keep each level cold, rather that the bottom of the cupboard ending up coldest.  It’s also fireproof which isn’t that relevant here but it’s useful as a plasterboard replacement.  Although this source is mined rather than waste magnesium oxide, which would have been better, it has a lower embodied energy than plasterboard.  It is however very heavy in large sheets.

Radiators

We have upgraded our collection of random rusting radiators and fitted Jaga radiators.  Because these have their own thermostats on them, they give us more control over room temperatures.  We have also fitted zone valves to each floor so that we can heat different areas at different times (particularly because we mostly work from home).  The radiators incorporate fans which pull the heat from the water, so we can run the heating at lower flow temperatures.  They also have a boost setting, so if the room is particularly cold you can speed up the fan and also the heating process.   The noise is similar to a computer cooling fan and we quickly stopped noticing it most of the time, although for light sleepers a radiator with no fan in the bedroom would have been better.

Kitchen


The first phase of work on the kitchen has been completed, including a structural steel cabinet which houses two ovens and holds up the chimney.  The stainless steel worktop was bent locally to create a shape that will hold up cupboards (except over the hob) and creates an elegant shape with no nasty corners to catch muck in.

The cupboard doors and drawer fronts are made from recycled timber from a demolished high school lab benches.

We’re currently slightly stuck on choosing the ideal board to make the sides of the cupboards and drawer unit out of – current choices include 100% recycled coloured MDF which is lovely but involved buying a whole pallet from Germany when we only need two boards (despite them having a UK subsidiary) or calcium silicate or magnesium oxide which would be ideal if they were made from industrial waste products but the ones we’ve found seem to be freshly mined for the purpose.

The idea is to create a kitchen that will last, with no intention of changing it for a more fashionable one in a few years time, and avoiding the use of plastic covered chipboard which is very difficult to recycle and not a very good idea to burn either.

Internal insulation for big rooms with no cornice

In the kitchen, there is no cornice (someone had put in a 1970s sauna style tongue and groove pine ceiling that fell off when we looked at it hard) and it’s a reasonably large room, so we used a thicker internal insulation instead of the aerogel.

This is Udi In Reco, 120mm thick, similar to the external insulation but with a special smooth internal render as the vapour control layer.  This fixed to the wall with much less trouble than the aerogel, using adjustable long screws with plastic plugs on the end.  It did mean some joinery work to extend the window cills and surrounds, but these were made with recycled old timber from other parts of the house so the colours match.

You can buy this insulation from Back to Earth.


Floor insulation

We have now insulated beneath all of the ground floor by removing the cellar ceiling and stuffing the gap between the joists with 200mm of hemp (except over the biomass boiler where we used 200mm of rockwool).

This was  a lovely material – cuts with a bread knife, smells like harvest time, and no more freezing cold feet. By cutting it slightly large, it holds itself in place with no fixings.  It was supplied by Back to Earth (see links for more info).

Eventually we’ll put the plasterboard back, which will be even better.

Internal insulation

We finally did the job of removing the plaster from the end wall of each room (the gable wall is already insulated externally) and replacing it with Fermacell board with a triple layer of aerogel bonded to it (27mm thickness in total).  The main problems were the dust created by the plaster removal, which gets around any attempt to sheet off the doorway of the room involved, and actually fixing the boards to uneven Victorian brickwork.  We didn’t use a nail gun as the bricks vary wildly in softness and quality of fix, so in the end after much trial and error (for which read swearing, in both English and Polish) the fixing method was : cut the boards outside (wearing dust masks because aerogel dust is really unpleasant), drill a hole through the board only then take a sharpened 6″ nail to make a mechanical hole in the polyester mat, then a cheap soldering iron with a long thin bit used to melt the polyester out of the way, then a tool of a brass tube in a piece of plywood is put through the hole to shield the drill bit while drilling a 4mm hole in the brickwork, remove brass tube and replace with piece of pub drinking straw and screw in fixing.  The pub straw was later ditched in favour of a frame screw which already has a plastic plug on it.  BUT calculatation suggest, and the thermal camera confirms, that this fixing method creates significant cold bridges which reduces the efficiency of the board.  If we were able to find a way of countersinking it we would use the plastic fixings with a nylon pin to produce no cold bridge, but these need to be recessed 3mm into the Fermacell if you want to be able to use the Fermacell surface finish and avoid plastering.  If plastering is not a problem these could be used without countersinking and plastered over.  We kept the board depth to a minimum and did not remove the cornices in the room, so the board just replaces the original plaster layer.

While this work was going on we also found huge amounts of cold air was getting in around some of the sash windows – as soon as the window surround was removed it was clear that a second world war bomb had blown the windows in and they had been shoved back out without being properly refixed (in 1941 judging by the newspapers packing the spaces).  So we were able to seal up these air paths too.  Next summer we need to replace the pointing around all the windows while they are repainted.

The good news is that the house feels significantly warmer!

Easier firewood delivery

We’ve been working on our firewood delivery – up to now it was being craned over our back wall in cages, dragged across the grass on a pallet trolley and thrown through the cellar windows to be stacked.  Quite hard work!  Now we have a ramp dug down to the basement door and wood arriving in trolleys (the ones used for stacking supermarket shelves).  These have been filled with waste wood from a building site which would otherwise have gone to landfill and we’ve got about two years timber lined up in the cellar and down the side ramp.   The boiler is much easier to fill from a trolley right next to it and we’re getting more heat from dry old timber.

I’ve also just added a link to Chorlton Eco Refurb, a local group working on getting more work done to the many houses in this area that need it.

Costs

The thing you realise when you add up all the costs is that all those little trips to the builders merchants do add up!  The costs below including fitting and VAT.

The log fired heating system + accumulator cost £7,234 and the solar install with controller and consolar stratifying tank cost £7,182 – this is higher than usual for solar but we have more tubes than anyone regards as normal and we’re still getting heat today in November.   As it’s fairly warm outside this will mean we will have enough hot water for showers and can light the small woodburner for heating (which cost £1,100 fitted) instead of the boiler.  For a similar price we could have had a pellet boiler and small solar install but this would have been less resource efficient – pellets have to be made and shipped around in tankers where our solar output is now cost free and we’re currently burning Udi woodfibre insulation offcuts, our old roof battens and some beams our builders took out of another house.    When nearby skips don’t fill our cellar we get wood from a local tree surgeon which is about two thirds of the cost of pellets.

We added a maintenance gantry and  access hatch costing £1,348 which isn’t a requirement but will be cheaper than hiring a scaffold tower when we need to do maintenance.

The new windows cost £635 per square metre, a total of £2,157 for four opening lights and two fixed.

The refurbished windows cost £170 per square metre, a total of £4,550 for twenty windows and secondary glazing the stained glass panels.  About half of this is labour and it’s not terribly complicated – if you can use a router and have time on your hands this could be done for alot less.

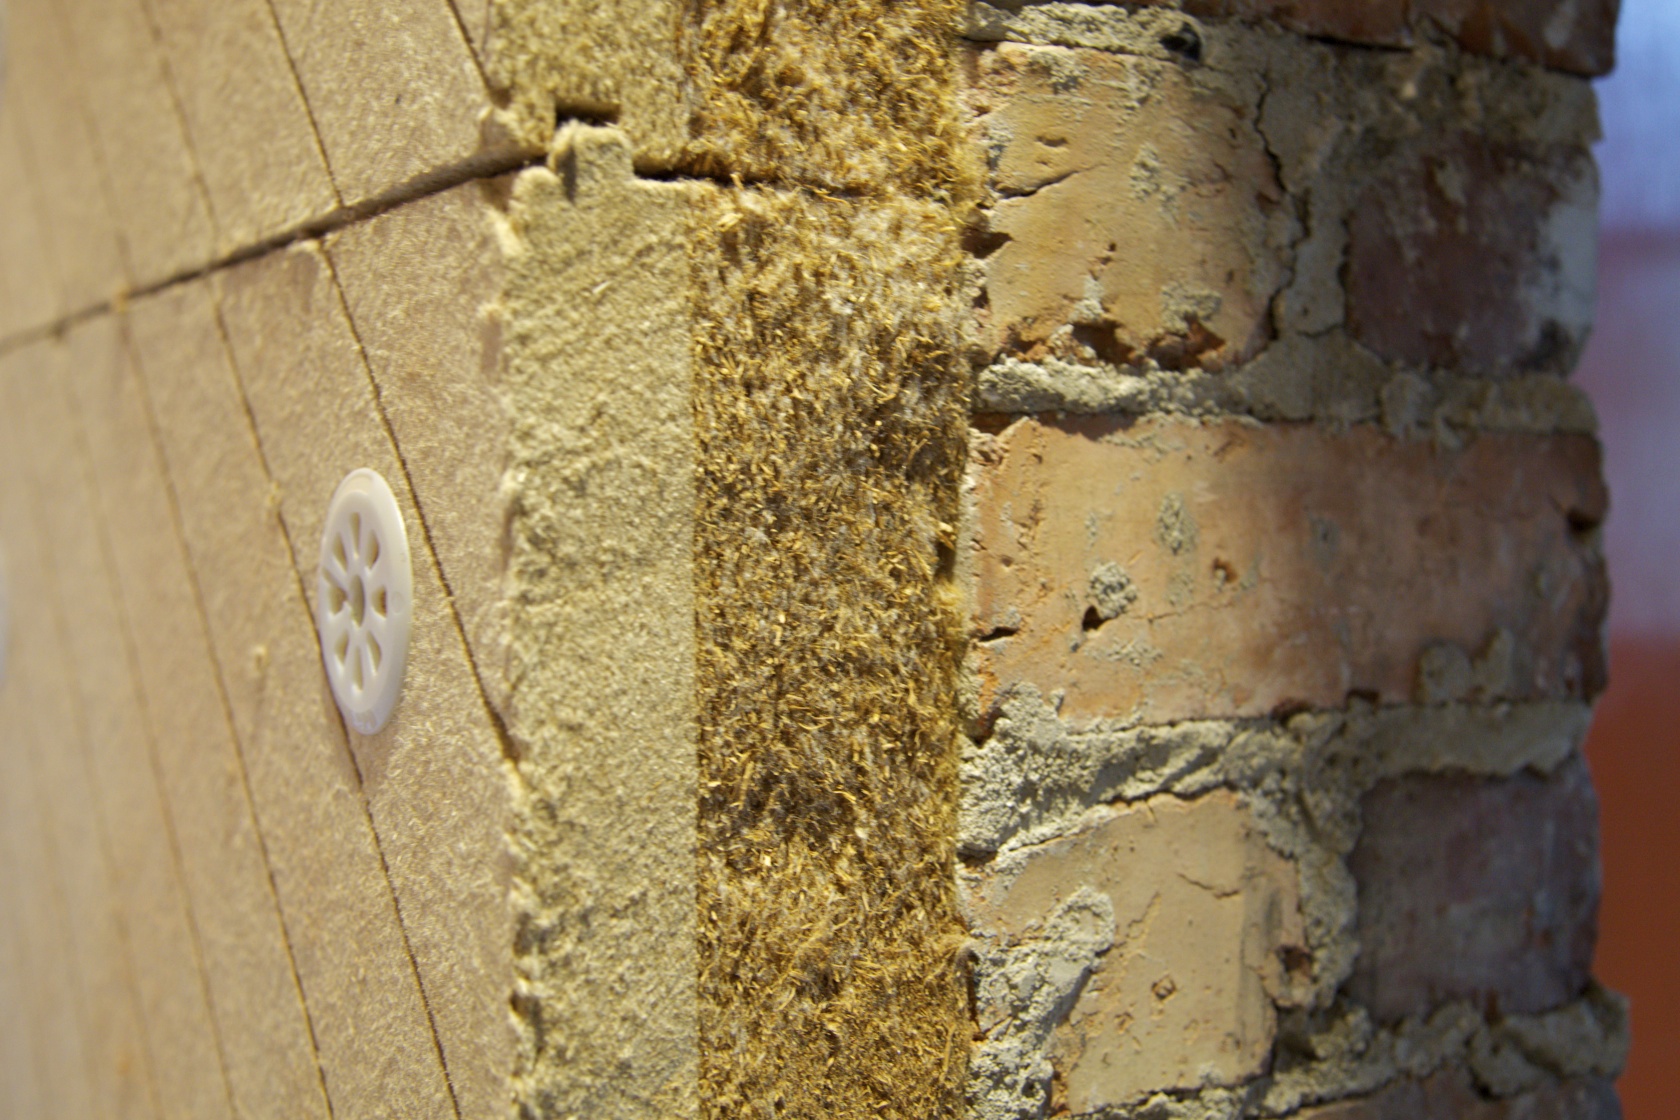
For insulation we spent £845 fitting glass wool under the ground floor by taking down the cellar ceiling.  We spent £5,159 on Spacetherm for the front and back walls and where ceiling height was a problem on the top floor.  We bought £638 of wool insulation and £172 of glasswool for the other areas of the top floor ceilings.  The Udi Reco system for the gable wall cost £9,373 in total, which is £134 per square metre.

So that’s a total of about £38,500 on the heating, insulation and draft proofing.

Having paid £297,000 for the house in 2004 we’ve spent just over £85,000 overall on maintenance and decoration, which is still less than we would have paid for a house this size in good order.   This has given us a brand new roof, draftproof windows, a seriously efficient heating and solar system, complete rewiring including burglar/smoke alarm system,  two refurbished bathrooms, two fully rebuilt bedrooms plus an office and a house which is now comfortable in winter – the first sign of spring used to be a visitor with their coat off!  Someone less interested in high quality design might not have needed top of the range window fittings, stainless steel sockets and light switches, Italian lights and feature window.  And the kitchen is still to be done…

November 2009

low energy lighting

18w dimmable fluorescent downlighters (6), 20W HID spotlights (4) and recessed downlights (4), 4 tungsten halogen task lights (4) and compact fluorescents everywhere else.

The house had to be re-wired on acquisition in 2005, so the opportunity was taken to light the house with the most efficient lighting available at the time, but not just utilitarian to show that low energy could mean good design too. LED’s were not available at the time, so spotlighting had to be done with High Intensity Discharge (HID) lamps. Downlighting is done mainly with dimmable, recessed compact fluorescent (PL) downlighters. There are 4 dimmable, separately controlled tungsten halogen tasklights – quite inefficient in comparison now, but only on when needed, and rarely on full brightness. The PL downlighters are a great success providing a warm, attractive, diffuse light. Their dimmability means they can be used according to mood or required function at the time. The HID’s are not so good, they take a while to warm up and once turned off cannot be relit until they have cooled down. Despite assurances from the iGuzzini salesman that these models were not too bad, the warm up time means you cannot turn on the light and walk straight into a room and the relighting period is still about 10 minutes so these lights tend to get left on too much – slightly undermining their energy saving potential. That said they are more efficient that fluorescent and spotlighting can provide much more attractive lighting. The first strip LED’s are about to be installed.

Existing Windows

New windows triple glazed in locally made FSC hardwood frames with double seals. All existing windows refurbished with coated double glazed units or secondary glazing to original stained glass.

The windows were almost all original single glazed timber windows except the attic windows which were later replacements already beyond repair. They are sliding sash on the back, opening casement on the front.

IMG_3101 sml
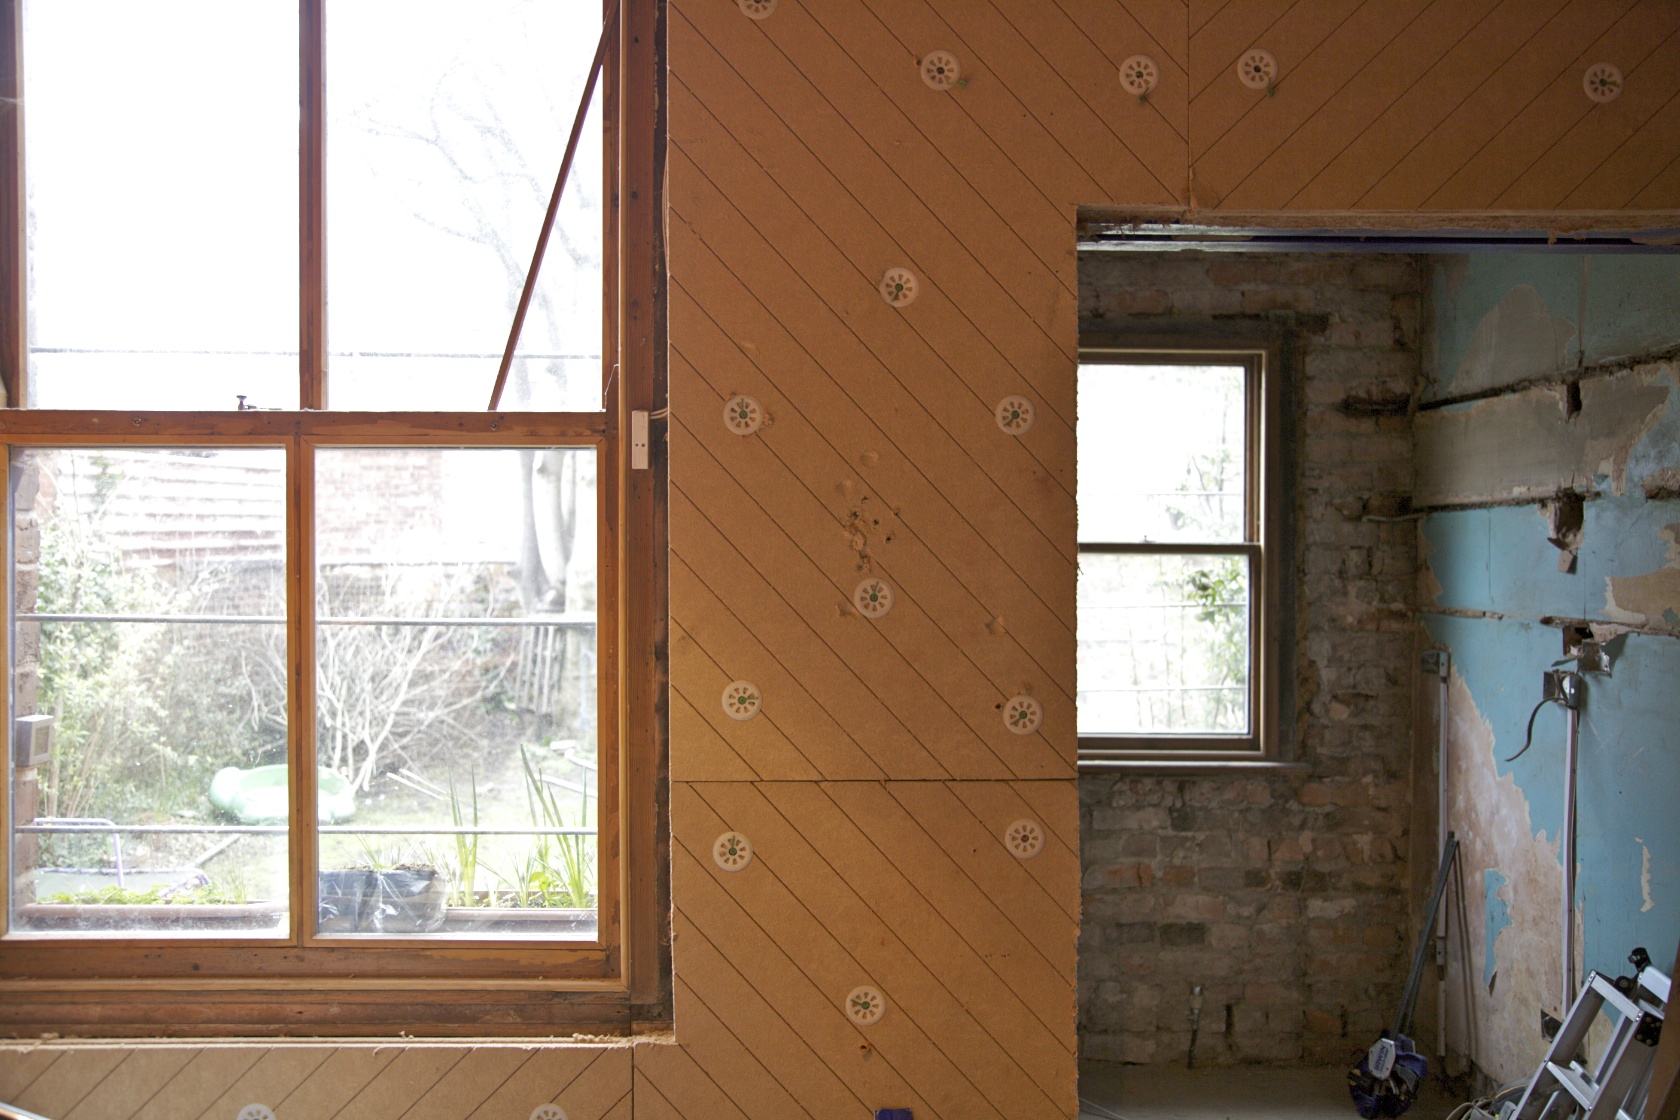
We’ve upgraded the existing windows instead of replacing them using a local carpenter, Reddiseals sash window parts and FSC certified hardwood (Guariuba) to build replacements where the existing had decayed too far. All the windows were fitted with double glazed units low E coated but not argon filled, initial windows had a tiny 6mm cavity as we perfected the way of doing it, this then increased to 9mm or 12mm where space allowed. Original stained glass has been secondary glazed on the inside to avoid condensation, mostly with single glazing but double where space has allowed. All the windows are now fully draft sealed – the sash windows have new parting and staff beads pre-fitted with draft seals. Neoprene O-profiles were routed into the casements, new and existing.

Some of the stained glass needed repairing, which was done by David Sidgwick in Stockport who did a great job.

Bathroom

Waxed FSC hardwood and Venetian plaster wetroom accommodating reclaimed bath.

The floor in the existing bathroom was mostly rotten so had to be stripped down, floor boards binned and half the joists replaced. The opportunity was taken to set the new floor to fall towards the centre of the room into a new floor drain.  The outside wall was internally insulated with 40mm of high density glass fibre then overclad with cementitious particle board (Viroc) as it is moisture resistant and stable (although it turns out not quite stable enough to avoid hairline cracks in the plaster). This was then coated in a sheet of thin polyester webbing soaked in liquid neoprene in all the areas likely to get a soaking. Due to the amount of movement in the floor the usual tile solution was not advisable so the floor and most of the 2 long walls were covered in 18mm tongue and groove FSC certified Cumaru from the Ecological Timber Company.

IMG_9238 sml

The internal face of the outside wall was covered in Venetian plaster from The Polished Plaster Company, the raw materials from Keighley, applied by our plasterer. The floor and polished plaster are waxed regularly and so far there have been no problems. The bath and taps are the originals. The bath was reglazed, taps just serviced and cleaned. The new taps are low flow spray taps.

Carbon Neutral Heating

40kW gasifying log burner and 10 sq.m of solar thermal collectors both feeding into heat stores providing space heating and hot water.

The boiler the house came with was so arthritic no engineer would touch it. Manchester is a smoke control zone. The only kit with the DEFRA exemption was either too big or eye wateringly expensive or both, and its fuel – pellets was mostly shipped in from abroad, slightly denting the low carbon credentials. Sundance Renewables – a co-op in south Wales introduced us to the Atmos gasifying log burner. It burns logs, sucking the flames into a chamber beneath the logs which ensures a very hot clean burn with minimal ash. We got hold of the test data and it is well below the threshold for exemption so after 18 months we talked the smoke control officer into letting us install one – although with the caveat that he has the right to insist on its removal if he gets complaints. It does emit smoke, but only really an issue for the first half an hour then it calms down and the whole process of a burn is finished within 2 hours anyway, all the heat is dumped into 2 water tanks – thermal accumulators. IMG_5493 sml They both have solar and hot water heat exchange coils in them. Cold water is pre-warmed in the lower larger tank first, then taken up to full temperature in the upper one. In summer the solar panels feed into the top tank first then when up to top temperature feed into the bottom. In winter they feed into the cooler lower tank. The top tank made by Consolar also has syphons in it that help make sure the store stratifies so that even when the heating draws hot water from the middle of the tank the top where the hot water is drawn through remains hot.IMG_4455 sml

We had alot of help with designing and fitting the system from Richard Drover and also from Greenshop Solar, who sold us the control system. solar panels

Solar Panels

We have put as many panels up as we could fit neatly to minimise the amount of wood we’ll have to burn. There are 80 tubes in 4 arrays running the full length of the ridge with a thin access walkway running beneath them that both masks them from the street below a little and allows safe access.  These are the cheapest well reviewed ones we could find from Navitron on the basis that with so much water into which to put the heat we do not need expensive methods of dealing with overheating. We have an added overheat protection of an old radiator from the top of the house plumbed behind the stored wood in the cellar so that spare heat can be used to dry wood further – needless to say in a Mancunian summer there was only 1 day when it looked like it might divert from the 2 tanks to this.